Free Pattern: Chic & Stylish Crochet Evening Bag (Sleek One-Piece Shoulder Bag)
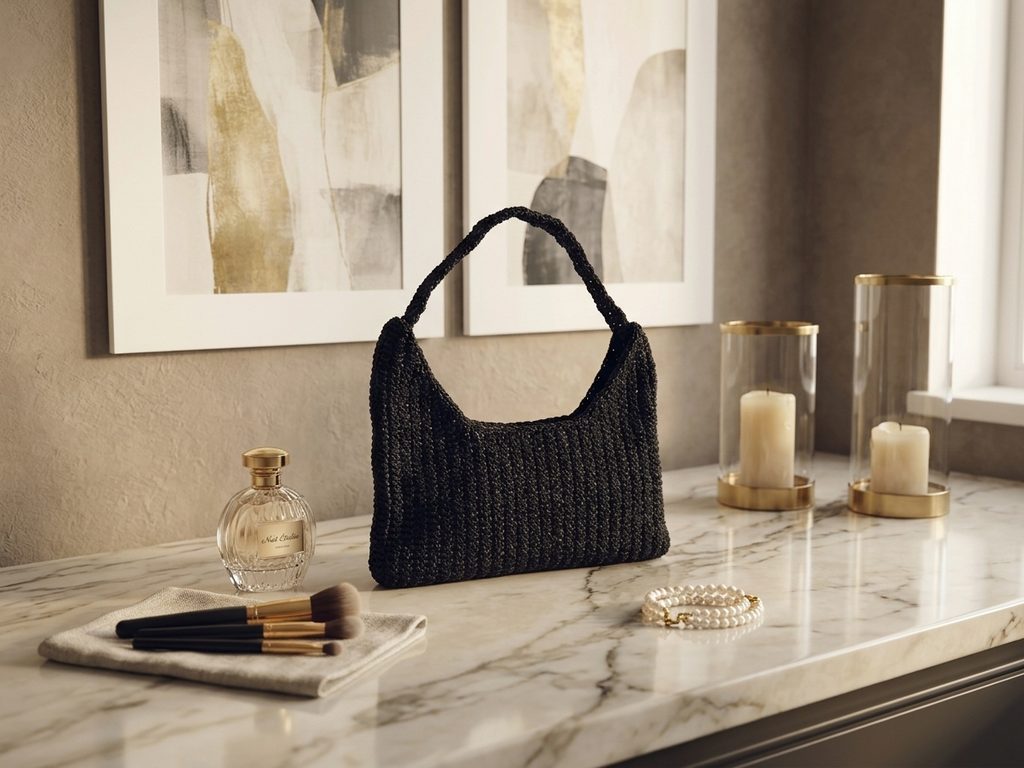
Looking for the ultimate free crochet shoulder evening bag pattern that looks like high-end designer streetwear? You are in the right place! This unbelievably stylish crochet bag is just SO easy to make! You’ll only need basic crochet skills, one continuous piece of crocheted fabric, and a couple of hours to whip up your new favorite accessory.
Whether you’re heading out for girls’ night, attending a chic wedding dinner, or upgrading your everyday wardrobe, this minimalist curved shoulder bag—inspired by viral luxury bag silhouettes—is guaranteed to turn heads.
Why You’ll Love This Free Crochet Bag Pattern
- Beginner-Friendly: Made almost entirely using single crochet stitches in back-and-forth rows.
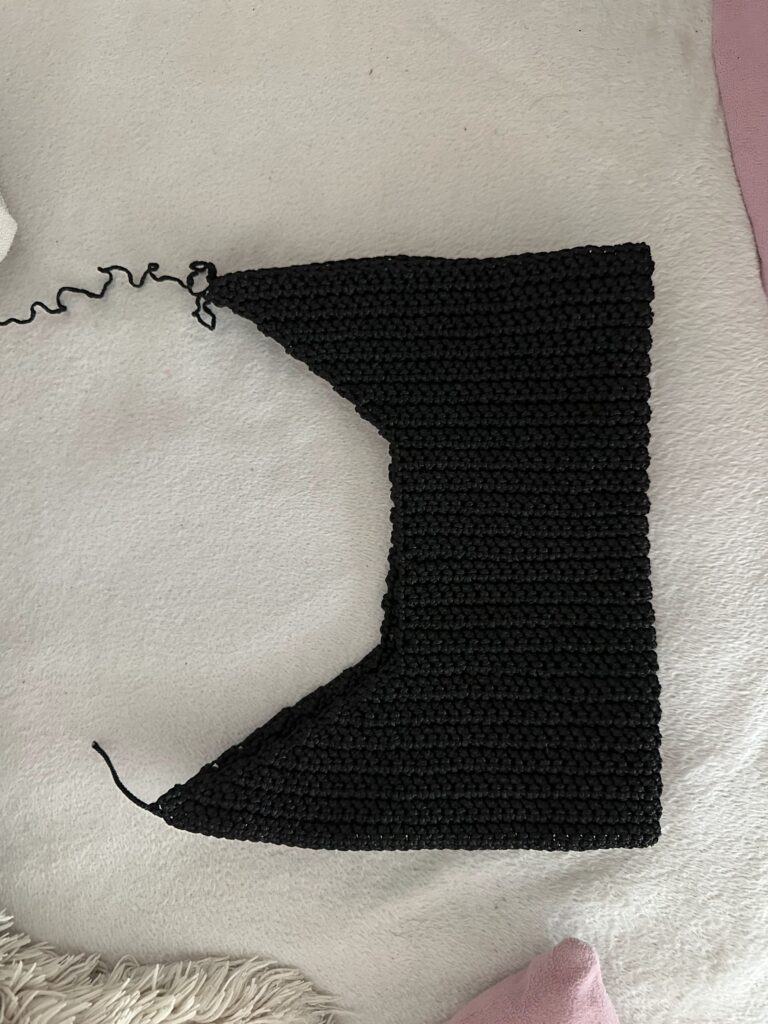
- No Complex Shaping: The entire bag body and strap wings are worked as one flat piece and seamlessly folded into shape.
- Customizable Closures & Straps: Express your style! Add a metal magnetic clasp, a chic twist lock, a leather button strap, or swap out the built-in handle for a glamorous gold chain.
- Minimalist & Modern: Clean lines and structured drape give it a high-end designer-boutique look for a fraction of the cost.
Pattern Overview & Sizing Guide
| Feature | Details |
| Skill Level | Easy / Upper Beginner |
| Terminology | Standard US Crochet Terms |
| Time Required | 1 – 1.5 Hours |
| Gauge | Tension isn’t strictly critical, but working tightly with nylon cord helps the bag maintain its structured shape. |
| Category | Free Crochet Pattern / Crochet Bag |
Materials & Tools
- Yarn / Cord: Approx. 250–300 meters of thin nylon cord / macramé yarn (or polyester cord/nylon crochet thread). Nylon cord gives the bag incredible structure, durability, and a subtle luxury sheen!
- Crochet Hook: 3.5 mm – 4.5 mm (adjust depending on your cord tension)
- Tapestry Needle / Darning Needle
- 2 Stitch Markers
- Scissors
- Hardware & Strap Options of Choice: (See custom closing and strap options below)
Abbreviations
- ch: chain
- sc: single crochet
- dec: decrease (single crochet 2 together / sc2tog)
- inc: increase (2 single crochet in the same stitch)
- st(s): stitch(es)
- tch: turning chain (ch 1 at the end of a row; does not count as a stitch)
Step-by-Step Written Crochet Pattern: Chic Shoulder Bag
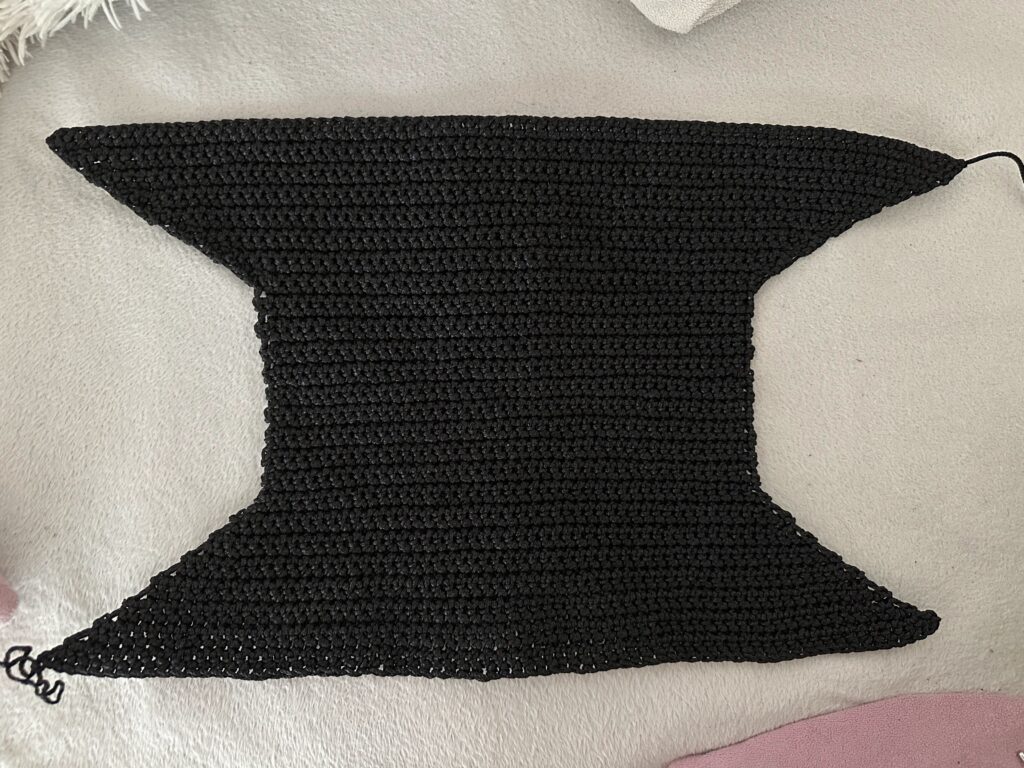
This pattern is worked in three seamless sections as one long panel:
- First Strap Wing (tapering down)
- Main Bag Body (straight middle section)
- Second Strap Wing (flaring out)
Pattern Overview (Quick Math Reference)
- Foundational Chain: 83 ch (yields 82 sc in Row 1)
- Strap Wing 1 (Decreases): Rows 1–19 decreasing on both sides from 82 sc down to 44 sc
- Main Bag Body (Straight Center): Rows 20–39 straight across 44 sc (20 rows total)
- Strap Wing 2 (Increases): Rows 40–59, increasing on both sides from 44 sc back up to 82 sc
Part 1: First Strap Wing (Tapering Down)
- Foundation: Chain 83.
- Row 1: 1 sc in 2nd ch from hook, dec over next 2 ch, 1 sc in each ch across until 3 ch remain, dec, 1 sc in last ch, ch 1, turn. (80 sc)
- Rows 2–19 (Decrease Rows):
- In every row, work: 1 sc, 1 dec, sc across to last 3 sts, 1 dec, 1 sc, ch 1, turn.
Row-by-Row Stitch Counts:
- Row 2: 78 sc
- Row 3: 76 sc
- Row 4: 74 sc
- Row 5: 72 sc
- Row 6: 70 sc
- Row 7: 68 sc
- Row 8: 66 sc
- Row 9: 64 sc
- Row 10: 62 sc
- Row 11: 60 sc
- Row 12: 58 sc
- Row 13: 56 sc
- Row 14: 54 sc
- Row 15: 52 sc
- Row 16: 50 sc
- Row 17: 48 sc
- Row 18: 46 sc
- Row 19: 44 sc
Part 2: Main Bag Body (Straight Center Section)
- Row 20: 1 sc in each of the 44 sts, ch 1, turn. (44 sc)
- Rows 21–39: Repeat Row 20. (44 sc per row; 20 rows total for the main body)
Pro Tip: Place a stitch marker at the beginning and end of Row 20 and Row 39. These mark the exact corner boundaries where your side seams will be folded and sewn together later!
Part 3: Second Strap Wing (Flaring Out)
- Rows 40–69 (Increase Rows):
- In every row, work: 1 inc (2 sc in 1st st), sc across to last st, 1 inc (2 sc in last st), ch 1, turn.
Row-by-Row Stitch Counts:
- Row 40: 46 sc
- Row 41: 48 sc
- Row 42: 50 sc
- Row 43: 52 sc
- Row 44: 54 sc
- Row 45: 56 sc
- Row 46: 58 sc
- Row 47: 60 sc
- Row 48: 62 sc
- Row 49: 64 sc
- Row 50: 66 sc
- Row 51: 68 sc
- Row 52: 70 sc
- Row 53: 72 sc
- Row 54: 74 sc
- Row 55: 76 sc
- Row 56: 78 sc
- Row 57: 80 sc
- Row 58: 82 sc
- Row 59: 84 sc (or complete to desired flared width matching Row 1)
Fasten off, leaving a long tail (approx. 70 cm / 28 inches) for joining the top strap!
Assembly & Finishing
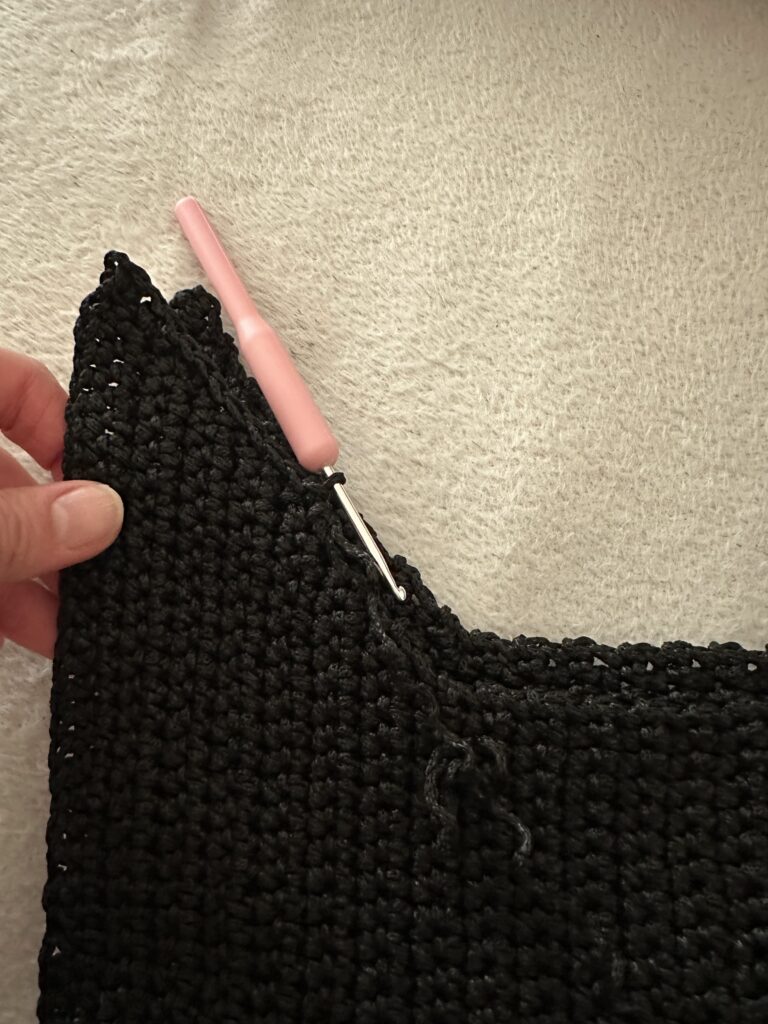
- Single Crochet Around the Curve (Edge Finishing): For a clean, professional finish, attach yarn and work a row of single crochet evenly along the curved inner/outer edges of the panel before seaming.
- Seam the Bag Body Sides: Fold your crocheted piece so that the wide starting edge Row 1 and Row 59 meet. Match stitch for stitch, then seam them together with slip stitches or a tapestry needle to create the bag body.
- Weave in Ends: Secure and weave in all yarn tails inside the bag. If using nylon cord, you can carefully singe the cut end with a lighter for a second to melt and permanently secure it.
Adding the Straps & Handle Style
You can easily alter or elevate the bag’s handles. Here are the top handmade and store-bought options:
Handmade / Crochet Strap Options
- The Easy Crochet Strap
If you want everything to match, crochet a separate strap from thin nylon cord and attach it to the top corners of the bag body.
- Option A: Super Clean & Rope-Like Braided Strap
- Chain 83 or as many as you think looks good. Make three chains. Now knot the end and braid the three chains into one big strap.
- Option B: Thermal Single Crochet Strap (Flat & Non-Stretch)
- How to do it: Chain 5. Work single crochet back and forth, but insert your hook into the back loop AND the unworked loop from the row below. The thermal stitch creates a double-thick, rigid band that won’t sag or stretch when you put heavy items in your purse.
- Heavy-Duty I-Cord Strap (Crossbody Conversion):
- How to make: Omit joining the top wings together. Instead, crochet a sturdy 3-stitch or 4-stitch I-cord (or Thermal Stitch band) to your desired crossbody length (approx. 110–120 cm). Attach swivel snap hooks to both ends and clip them onto D-rings sewn into the bag’s side corners.
- Vibe: Hands-free, casual-chic, and functional.
Orderable / Store-Bought Strap Options
- Chic Metal Curb Chain Strap (Gold, Silver, or Gunmetal):
- How to attach: Sew two small metal D-rings or O-rings inside the top side seams of the bag body, then clip the chain directly on.
- Vibe: High-end evening glam, sleek, and ready for a night out.
- Vegan Leather Shoulder Strap (Of course we opt for the vegan option!):
- How to attach: Rivet or sew leather tab loops onto the side seams, or clip onto attached D-rings.
- Vibe: Sophisticated, structured, boutique-quality.
- Chunky Acrylic / Resin Chain Strap:
- How to attach: Clip directly onto side D-rings or woven ribbon loops.
- Vibe: Trendy, Y2K-inspired, and eye-catching.
Stylish Closure Options for Your Bag
Customizing your closure is where your bag transforms from handcrafted to boutique-worthy! Here are four fantastic ways to close your crochet evening bag:
- Metal Twist-Lock or Metallic Turn-Lock Clasp (High-Fashion Look)
- How to attach: Attach a small crochet flap (e.g., 8 sc wide by 10 rows long) to the back top center rim. Fasten the metal lock mechanism directly onto the flap and front body using the hardware’s metal prongs.
- Vibe: Ultra-luxurious, structure-focused, and vintage designer aesthetic.
- Sew-In Magnetic Snap Button (Sleek & Invisible)
- How to attach: Hand-sew a strong magnetic snap clasp directly onto the inside top rim of the front and back body panels using strong thread.
- Vibe: Minimalist, clean, and completely hidden from the outside.
- Crocheted Strap with a Statement Wooden or Pearl Button
- How to attach: Crochet a small tab (ch 6, sc across for 8 rows), leaving a buttonhole loop (ch 3) at the tip. Sew the tab to the back rim, then add a statement pearl or gold button to the center front.
- Vibe: Modern boho, elegant, and decorative.
- Metal Zipper (Secure & Functional)
- How to attach: Hand-sew a 20 cm metal or nylon zipper along the top inner opening using matching thread and a backstitch.
- Vibe: Maximum security for keys, cards, and lip balm when out on the town.
Frequently Asked Questions (FAQ)
Can I use cotton or acrylic yarn instead of nylon cord?
Yes! While nylon or polyester cord provides maximum structure and a glossy finish, you can also use DK- or worsted-weight cotton yarn or T-shirt yarn. If using lighter yarn, hold two strands together to maintain stiffness and body.
How do I stop my crochet bag from stretching out?
Nylon cord inherently has very little stretch, making it ideal for bags! However, if you use soft cotton or acrylic yarn, consider sewing in a simple fabric lining or adding a strip of plastic canvas along the bottom seam.
How big is the finished bag?
When made with standard nylon cord and a 4.0 mm hook, the finished bag body measures approximately 26–28 cm (10.5 inches) wide and 15–18 cm (6.5 inches) tall, with a comfortable under-arm strap loop height.