Free Crochet Pattern: Candy Cane Pillow, Timeless Festive Christmas Decor!
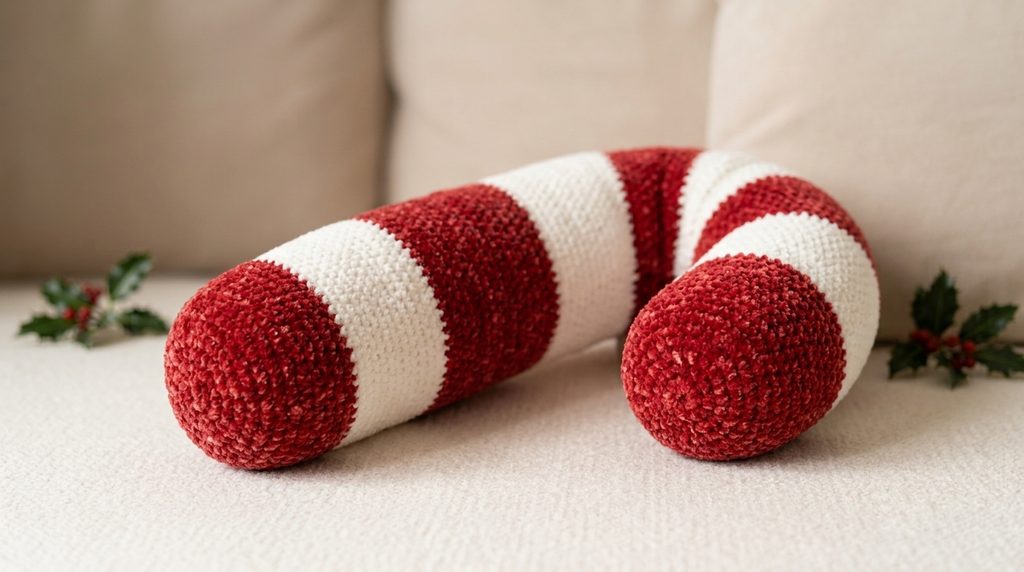
Transform your home into a cozy holiday wonderland with the ultimate festive accent piece: The DIY Crochet Candy Cane Pillow!
The best thing about this classic Christmas crochet project is how seamless and structured it turns out. Featuring crisp red-and-white stripes, smart short-row shaping for a natural hook curve, and clean transition rounds, this plush holiday accent brings vintage charm to any sofa, bed, or nursery nook. Whether you are crafting cozy handmade gifts, refreshing your winter mantle, or stocking your shop for holiday markets, this project comes together in just a few evenings!
Why You’ll Love This Free Crochet Candy Cane Pillow Pattern
- Seamless Color Transitions: Learn simple Back-Loop-Only (BLO) slip-stitch joins for clean, crisp color changes without jagged edges.
- Natural Curved Shaping: Built-in short rows create a perfect candy cane arch that retains its shape without needing wire supports.
- Beginner-Friendly Technique: Built using foundational crochet stitches: chain, single crochet, slip stitch, increase, and decrease.
- Top Christmas Market & Etsy Seller: Holiday decor items peak on Pinterest, TikTok, and Etsy from September through December. Fast to stock and highly visual, this makes a holiday bestseller!
Pattern Overview & Sizing Guide
| Feature | Details |
| Skill Level | Intermediate / Advanced Beginner |
| Terminology | Standard US Crochet Terms |
| Time Required | 4 – 6 Hours |
| Finished Size | Approx. 18–20 inches (45–50 cm) tall |
| Category | Free Crochet Pillow Pattern / Christmas Home Decor |
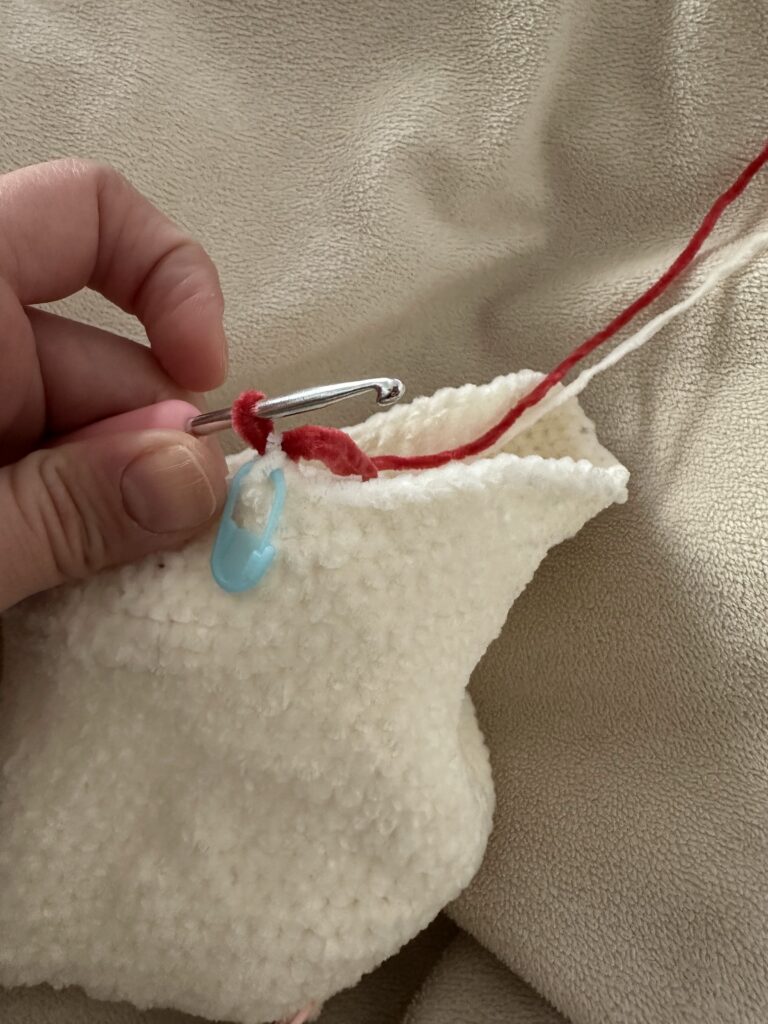
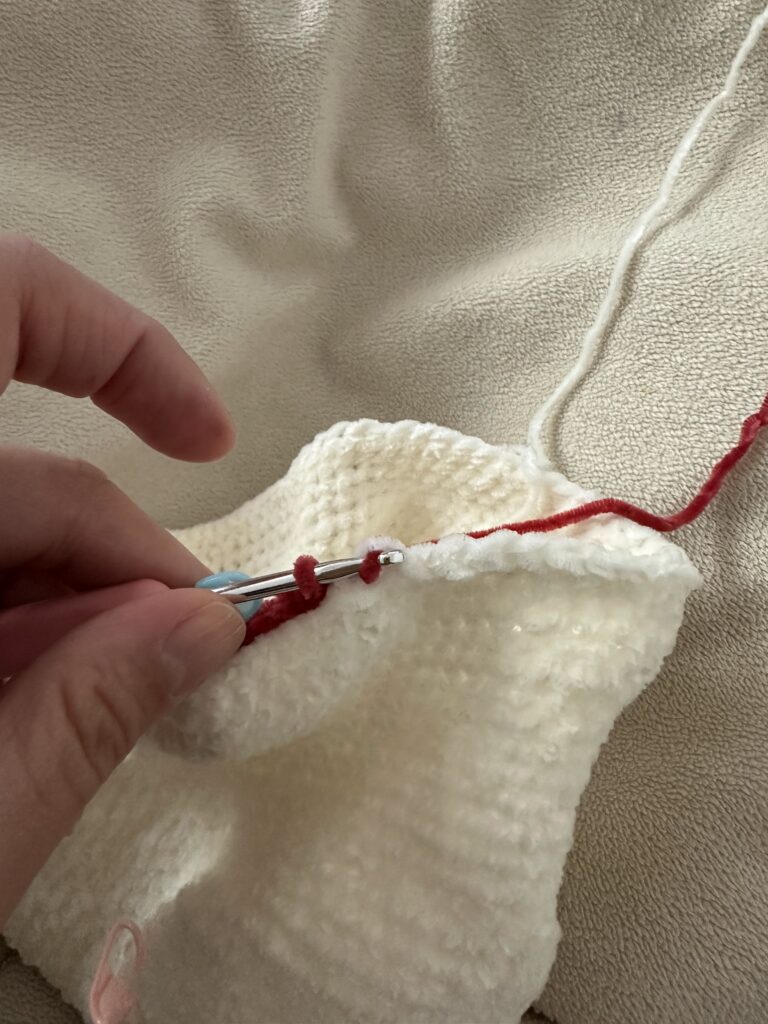
Pro-Tip for Seamless Stripes: To avoid a harsh stair-step look when swapping colors, always complete the final pull-through of the last single crochet of a section with your new color choice, then execute the BLO transition round!
Materials & Tools
- Yarn: Plush Super Bulky / Velvet Yarn (Category 6) or Worsted Weight Acrylic (Category 4 held double) in Bright Red and Snow White.
- Chenille / Velvet Yarn: Best for a trendy, squishy, ultra-cozy plush finish.
- Worsted-weight acrylic: Best for firm structure, stitch definition, and durability.
- Crochet Hook: 5.0 mm (US H-8) hook or 6.0 mm (US J-10) depending on yarn gauge.
- Stuffing: Premium Polyester Fiberfill (stuff firmly as you go!).
- Tools: Yarn needle, scissors, stitch markers.
Abbreviations (US Crochet Terms)
- ch: Chain
- sc: Single Crochet
- inc: Increase (2 sc in same stitch)
- dec: Decrease (sc 2 stitches together)
- sl st: Slip Stitch
- BLO: Back Loop Only
- st(s): Stitch(es)
- [ ]: Total stitch count at end of round/row
Step-by-Step Free Crochet Pattern: Candy Cane Christmas Pillow
Part 1: Bottom Base & Straight Stem
Base (Starting in White)
- Round 1: Start with a Magic Ring, work 6 sc into ring [6]
- Round 2: Inc in each st around [12]
- Round 3: [1 sc, 1 inc] × 6 [18]
- Round 4: [2 sc, 1 inc] × 6 [24]
- Round 5: [3 sc, 1 inc] × 6 [30]
- Round 6: [4 sc, 1 inc] × 6 [36]
- Round 7: [5 sc, 1 inc] × 6 [42]
- Round 8: [6 sc, 1 inc] × 6 [48]
- Round 9: [7 sc, 1 inc] × 6 [54]
- Round 10: [8 sc, 1 inc] × 6 [60]
- Round 11: [9 sc, 1 inc] × 6 [66]
- Round 12: [10 sc, 1 inc] × 6 [72]
- Round 13: [11 sc, 1 inc] × 6 [78]
Section 1: White Straight Section
- Rounds 14–23 (10 rounds): 1 sc in each st around [78]
Section 2: First Red Stripe (Seamless Transition)
- Round 24 (Transition Round): Switch to Red. In BLO, sl st in each st around [78]
- Rounds 25–35 (11 rounds): 1 sc in each st around [78]
Section 3: Second White Stripe
- Round 36 (Transition Round): Switch to White. In BLO, sl st in each st around [78]
- Rounds 37–47 (11 rounds): 1 sc in each st around [78]
Section 4: Second Red Stripe
- Round 48 (Transition Round): Switch to Red. In BLO, sl st in each st around [78]
- Rounds 49–59 (11 rounds): 1 sc in each st around [78]
Stuffing Tip: Stuff the bottom base and lower straight tube firmly with fiberfill now before starting the curved arch.
Part 2: The Hook Curve (Short-Row Shaping)
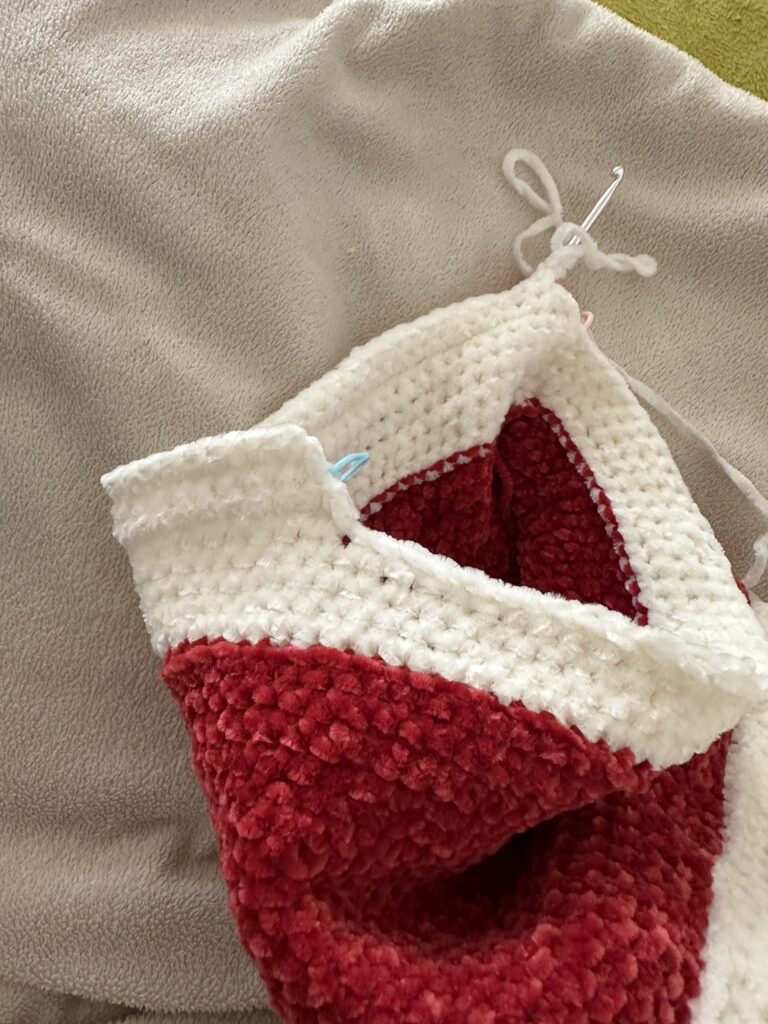
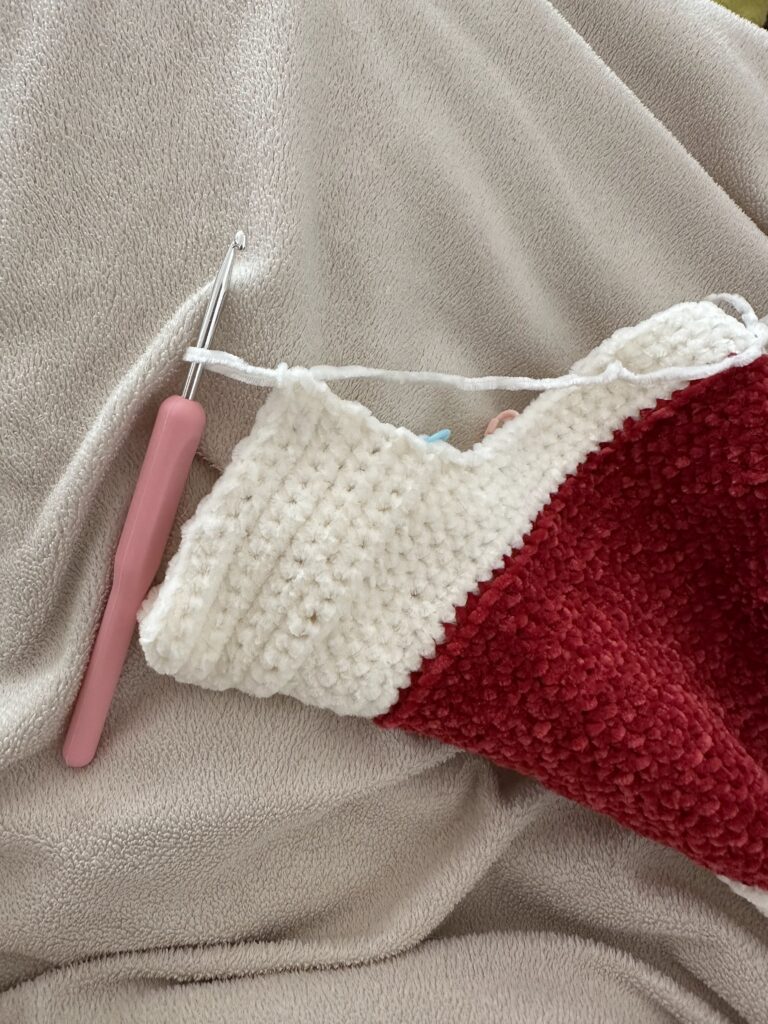
To form the smooth bend of the candy cane without creasing, you will work short rows back and forth across the outer half (39 stitches) while leaving the inner 39 stitches unworked.
Section 5: White Stripe (Curve Start)
- Transition Round: Switch to White. Work 1 round of BLO sl st across all 78 sts [78].
- Straight Rounds: Work 2 full rounds of 78 sc [78].
- Short-Row Shaping (Outer Radius):
- Row 1: Work 39 sc across outer half, ch 1, turn [39].
- Rows 2–4: Work 39 sc, ch 1, turn [39].
- Straight Rounds: Rejoin in the round. Work 5 full rounds of 78 sc across all stitches (smoothing down short-row edges). On final stitch, pull through Red. Fasten off White [78].
Section 6: Red Stripe (Mid-Curve Bend)
- Transition Round: Switch to Red. Work 1 round of BLO sl st across all 78 sts [78].
- Straight Rounds: Work 2 full rounds of 78 sc [78].
- Short-Row Shaping:
- Row 1: Work 39 sc across outer half, ch 1, turn [39].
- Rows 2–4: Work 39 sc back and forth, ch 1 and turn at each end [39].
- Straight Rounds: Rejoin in the round. Work 5 full rounds of 78 sc across all stitches. On the final stitch, pull through White. Fasten off Red [78].
Section 7: White Stripe (Top Arch Bend)
- Transition Round: Switch to White. Work 1 round of BLO sl st across all 78 sts [78].
- Straight Rounds: Work 2 full rounds of 78 sc [78].
- Short-Row Shaping:
- Row 1: Work 39 sc across outer half, ch 1, turn [39].
- Rows 2–5: Work 39 sc back and forth, ch 1 and turn at each end [39].
- Straight Rounds: Rejoin in the round. Work 4 full rounds of 78 sc across all stitches. On the final stitch, pull through Red. Fasten off White [78].
Stuffing Tip: Stuff the arch as you go! Pack fiberfill firmly into the outer curve so the top arch remains plump and maintains its natural shape.
Part 3: Top Cap & Closing
Section 8: Final Red Cap
- Round 1 (Transition Round): Switch to Red. Work 1 round of BLO sl st in each st around [78].
- Rounds 2–4: Work 1 sc in each st around for 3 rounds [78].
Decrease Rounds:
- Round 5: [11 sc, 1 dec] × 6 [72]
- Round 6: [10 sc, 1 dec] × 6 [66]
- Round 7: [9 sc, 1 dec] × 6 [60]
- Round 8: [8 sc, 1 dec] × 6 [54]
- Round 9: [7 sc, 1 dec] × 6 [48]
- Round 10: [12 sc, 1 dec] × 6 [42] (Adjusted step down)
- Round 11: [5 sc, 1 dec] × 6 [36]
- Round 12: [4 sc, 1 dec] × 6 [30]. Finish stuffing firmly.
- Round 13: [3 sc, 1 dec] × 6 [24]
- Round 14: [2 sc, 1 dec] × 6 [18]
- Round 15: [1 sc, 1 dec] × 6 [12]
- Round 16: [1 dec] × 6 [6]
Finishing & Assembly
- Fill any remaining void in the tip with fiberfill so the cap is completely smooth and rounded.
- Fasten off Red, leaving an 8-inch tail.
- Thread the tail onto a tapestry needle, weave through the front loops of the final 6 stitches, pull tight to cinch closed, knot securely, and weave the end inside the pillow.
Frequently Asked Questions (FAQ)
How do I get clean, seamless color changes without harsh steps?
Working a Back Loop Only (BLO) slip-stitch round at the start of each color swap smooths the transition, creating a crisp line between red and white stripes instead of a jagged, stepped edge.
Does this crochet candy cane pillow require wire inside to stay curved?
No wire is needed! The short-row shaping technique automatically forces the tube into a natural 3D curve. As long as you stuff the outer curve firmly with fiberfill, the pillow will hold its arch on its own.
What yarn works best for plush holiday crochet pillows?
Chenille or plush velvet yarns (Category 5 or 6) yield a soft, squishy finish ideal for couch decor. For tighter stitch definition and greater durability, use a double-stranded, standard Category 4 worsted-weight acrylic yarn with a 5.0 mm hook.