Cat Ear Beanie: Free Crochet Pattern for the Easiest & Cutest No-Sew Cat Beanie
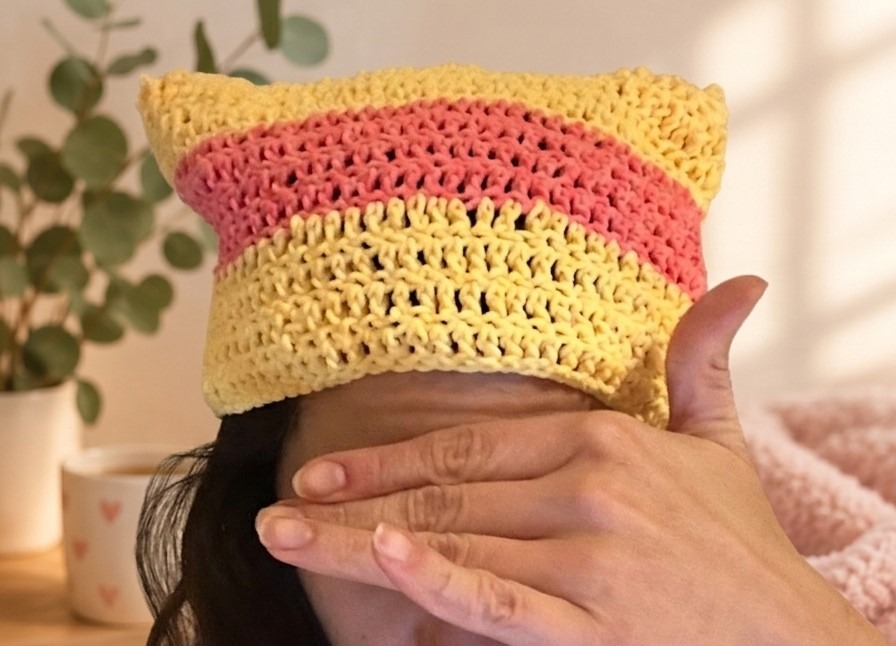
The cutest fall and winter look for you, your baby, or your partner is here: The DIY Crochet Cat Ear Beanie!
The best thing about this timeless, Y2K-inspired piece is how simple it is to make. There is zero sewing required – you will work simple basic stitches in the round and create instant 3D cat ears just by seaming the top edge straight across. Whether you are crafting cozy gifts or prepping stock for your next market, this project works up in under two hours!
Read on for 3 free variations:
- The Classic Solid Cat Ear Beanie
- The Striped Grunge Beanie
- The Ribbed Brim Statement Beanie
Why You’ll Love This Free Crochet Cat Ear Beanie Pattern
- 100% No-Sew: No sewing individual ears onto a cap! The square top automatically shapes into pointy cat ears when worn.
- Beginner-Friendly: Uses foundational stitches: chain, single crochet, half double crochet, and double crochet.
- Customizable Styles & Sizes: Works with velvet/chenille yarn for a plush, squishy look, or worsted-weight acrylic/wool for clean stitch definition.
- Great Craft Fair & Etsy Seller: Cat ear beanies trend every autumn/winter on TikTok and Pinterest. They work up fast, making them top sellers for market pop-ups and online handmade shops.
Pattern Overview & Sizing Guide
| Feature | Details |
| Skill Level | Easy / Advanced Beginner |
| Terminology | Standard US Crochet Terms |
| Time Required | 1.5 – 2.5 Hours |
| Finished Size | Adult Standard (~20–22″ circumference); easily adjustable for babies & kids |
| Category | Free Crochet Hat Pattern / Winter Accessories |
Pro-Tip for Perfect Sizing: Because head sizes and yarn gauges vary, wrap your foundation chain around your head before joining. It should fit comfortably around the widest part of your head without stretching too tightly. Ensure your total starting chain is an even number (or a multiple of 2) for smooth rounds!
Materials & Tools
- Yarn: Choosing the Best Yarn for Your Cat Beanie
Wool Blend Yarn: Offers incredible heat retention for chilly autumn and winter outdoor wear.
- Crochet Hook: 5.0 mm (US H-8) hook (or the size needed to meet your yarn gauge).
- Scissors
- Stitch markers
Abbreviations (US Crochet Terms)
- ch: Chain
- sc: Single Crochet
- hdc: Half Double Crochet
- dc: Double Crochet
- sl st: Slip Stitch
- BLO: Back Loop Only
- st(s): Stitch(es)
- [ ]: Total stitch count at the end of the round
Step-by-Step Free Crochet Cat Ear Beanie Pattern
1. The Classic Solid Cat Ear Beanie
Foundation Ring & Sizing
- Foundation: Chain 72 (or any even number of chains needed to comfortably fit around your head circumference; e.g., 60 chains for toddlers, 72 for standard adult, 80-88 for bulky/looser fits). Chain 72 and try the chain around your head.
- Being careful not to twist the chain, join the last chain to the first chain with a sl st to form a large circle.
Body of the Beanie
- Round 1: Ch 3 (counts as first dc here and throughout). Dc in each ch around. Join with a sl st to the top of the turning ch-3. [72 sts]
- Rounds 2–14 (or until desired height): Ch 3, dc in each st around. Join with a sl st to the top of ch-3. [72 sts per round]
Note: Try the tube on your head. You want the top edge to reach about 1.5 to 2 inches above the crown of your head so the ears pop up sharply when closed.
Fast Seaming (No-Sew Ear Formation)
- Turn the beanie inside out.
- Flatten the top opening so the front and back stitches align evenly.
- Ch 1, working through both loops of both layers at the same time, sc straight across the top edge to seal the beanie shut.
- Fasten off and weave in all loose ends. Turn the beanie right side out.
- Put it on – your head naturally pushes the top corners outward, forming adorable cat ears!
2. The Striped Grunge Beanie
Follow the instructions for the Classic Solid Beanie, but add color blocks for an alternative Y2K striped look.
- Rounds 1–2 (Color A): Work in Color A.
- Color Change: On the final yarn-over of the last dc in Round 2, pull through with Color B.
- Rounds 3–4 (Color B): Work in Color B.
- Alternate between Color A and Color B every 2 rounds until you reach Round 14.
- Close the top edge using the same single-crochet seaming technique as the classic version.
3. Cat Ear Beanie with Ribbed Brim
A vertical ribbed brim gives your beanie a cozy, fold-over modern look.
- Work the Main Body: Complete Rounds 1–14 and seam the top edge as outlined in Pattern 1.
- Attach Brim: Attach yarn with a sl st anywhere along the bottom foundation edge.
- Chain for Brim Height: Ch 11.
- Row 1: Hdc in 2nd ch from hook and in each ch across back toward the beanie edge [10 hdc]. Sl st into the next 2 sts on the beanie bottom edge to anchor the row. Turn.
- Row 2: Skip the 2 sl sts, hdc in BLO across the 10 brim sts. Ch 1, turn. [10 hdc]
- Row 3: Hdc in BLO across all 10 sts. Sl st into the next 2 sts along the beanie edge. Turn.
- Repeat Rows 2 & 3 all the way around the bottom circumference.
- Sl st or seam the first and last brim rows together. Fasten off and weave in ends!
FAQ: Crochet Cat Ear Beanie
- How do the cat ears form if there’s no shaping?
- Because the beanie is crocheted as a simple rectangular tube, the corners naturally push upward and outward when you pull it over your head, creating sharp, prominent 3D cat ears automatically!
- Can I use super bulky or chenille velvet yarn?
- Yes! Plush velvet or chenille yarn makes an amazingly soft, squishy beanie. Just adjust your starting chain count (usually around 48–56 chains depending on yarn thickness) and use a larger hook (6.0 mm to 7.0 mm).
- How do I resize this for kids or toddlers?
- Measure the child’s head circumference, then chain an even number of stitches until the chain fits snugly around their head. Decrease the total number of rounds by 2-4 rows so the hat isn’t too tall.
Final Thoughts
And there you have it – the ultimate no-sew crochet cat ear beanie in three fun, customizable styles! Whether you made the minimalist solid version, went full Y2K grunge with stripes, or added that cozy ribbed brim, you now have a chic winter accessory you can whip up in no time.
Because this pattern works up in just an hour or two, it is the perfect last-minute gift for friends and family.